안드로이드 개발의 구성요소
화면개발(그림) + 로직개발(동작)
- 화면개발 : XML 개발
- 로직개발 : JAVA 개발
- 개발순서 : 화면개발(XML) - 로직개발(JAVA) : 단위별로 반복한다. 화면-로직 > 화면-로직 > 화면-로직 > ...
- 하나의 화면과 로직 묶음 => Activity 액티비티
- activity를 생성하면 자동으로 xml과 java 두개도 자동으로 셋팅이 된다.
- 당연히 어느 작동을 하고 싶을 때 어떤 코드를 어느 위치에 넣어야 하는지를 정하고 시작한다.
- 안드로이드스튜디오는 클라이언트 개발 프로그램이다.
- 가상환경을 설치해서 돌아가기 때문에 헤비함, 디스크 메모리 cpu 좋은 거 써야 작업이 잘 진행된다.
♠ xml파일 초기 코드는 ConstraintLayout에 담아야 한다.
http://schemas.android.com/apk/res/android"
xmlns:app="http://schemas.android.com/apk/res-auto"
xmlns:tools="http://schemas.android.com/tools"
android:layout_width="match_parent"
android:layout_height="match_parent"
tools:context=".MainActivity"/>
♠ 이미지는 보통 png로 만듦.
♠ 디렉토리 생성할 때 리소스 타입을 지정해 줘야 한다.
♠ sound file들은 res 디렉토리 안에 raw 폴더 만들어서 저장해 준다.
★ dp = > 뷰 화면구성할 때의 단위.
★ sp = > 글자의 크기 단위
인텐트를 포함하고 있는 액티비티를 실행하면 메인 엑티비티를 실행한다.
메인함수는 프레임워크가 가지고 있다.
안드로이드 인텐트 필터를 포함하고 있는 메인액티비티를 실행한다.
개발자가 그렇게 만들어 놓음
♠ 화면개발을 하고 인터렉션이 있는 view(각 요소)마다 ID 셋팅해줘야 한다.

app / manifests / AndroidManifest.xml
<?xml version="1.0" encoding="utf-8"?>
<manifest xmlns:android="http://schemas.android.com/apk/res/android"
    xmlns:tools="http://schemas.android.com/tools">

    <application
        android:allowBackup="true"
        android:dataExtractionRules="@xml/data_extraction_rules"
        android:fullBackupContent="@xml/backup_rules"
        android:icon="@mipmap/ic_launcher"
        android:label="@string/app_name"
        android:roundIcon="@mipmap/ic_launcher_round"
        android:supportsRtl="true"
        android:theme="@style/Theme.DiceApp"
        tools:targetApi="30">
        <activity
            android:name=".MainActivity"
            android:exported="true">
            <intent-filter>
                <action android:name="android.intent.action.MAIN" />
                <category android:name="android.intent.category.LAUNCHER" />
            </intent-filter>
    </activity>
    </application>

</manifest>
manifests는 앱의 환경설정을 하는 곳이다.
empty Activity 생성 후
위와 같이 <activity> 부분만 아래와 같은 구문을 넣어 준 것이다.
        <activity
            android:name=".MainActivity"
            android:exported="true">
            <intent-filter>
                <action android:name="android.intent.action.MAIN" />
                <category android:name="android.intent.category.LAUNCHER" />
            </intent-filter>
        </activity>
애초에 생성할 때 Launcher Activity를 체크해주고 생성해도 된다.

app / java / com.bpdev.diceapp / MainActivity.java
package com.bpdev.diceapp;
import androidx.appcompat.app.AppCompatActivity;

import android.media.MediaPlayer;
import android.os.Bundle;
import android.util.Log;
import android.view.View;
import android.widget.Button;
import android.widget.ImageView;

import com.daimajia.androidanimations.library.Techniques;
import com.daimajia.androidanimations.library.YoYo;

import java.util.Random;

public class MainActivity extends AppCompatActivity {

    // 화면에서 유저와 인터렉티브 되는 뷰들은 멤버변수로 만든다.
    Button button;
    // 장식은 안 가져와도 된다.
    ImageView imgDice1;
    ImageView imgDice2;
    MediaPlayer mp;


    @Override
    protected void onCreate(Bundle savedInstanceState) {
        super.onCreate(savedInstanceState);
        setContentView(R.layout.activity_main);

        button = findViewById(R.id.button);
        imgDice1 = findViewById(R.id.imgDice1);
        imgDice2 = findViewById(R.id.imgDice2);
        mp = MediaPlayer.create(MainActivity.this, R.raw.dice_sound);

        // 유저가 탭하는 것을 유저의 이벤트라고 한다.


        // 유저가 버튼을 누르면, 작성하는 코드!
        button.setOnClickListener(new View.OnClickListener() {
            @Override
            public void onClick(View view) {
                // 테스트 코드 작성!
                // 로그를 찍어 보자!!
                Log.i("Dice Main", "버튼 눌렸다.");

                // 1. 주사위 굴리는 소리
                mp.start();

                // 2. 랜덤으로 숫자 2개를 가져온다.
                Random random = new Random();
                int num1 = random.nextInt(5+1);
                int num2 = random.nextInt(5+1);

                Log.i("Dice Main", "랜덤 숫자:" + num1+", "+ num2);


                // 3. 해당 숫자에 맞는 주사위 이미지를 보여준다.
                if (num1 == 0){
                    // 주사위1을 화면1에 표시한다.
                    imgDice1.setImageResource(R.drawable.dice1);
                } else if (num1 == 1) {
                    // 주사위2을 화면1에 표시한다.
                    imgDice1.setImageResource(R.drawable.dice2);
                } else if (num1 == 2) {
                    // 주사위3을 화면1에 표시한다.
                    imgDice1.setImageResource(R.drawable.dice3);
                }else if (num1 == 3) {
                    // 주사위4을 화면1에 표시한다.
                    imgDice1.setImageResource(R.drawable.dice4);
                }else if (num1 == 4) {
                    // 주사위5을 화면1에 표시한다.
                    imgDice1.setImageResource(R.drawable.dice5);
                }else if (num1 == 6) {
                    // 주사위6을 화면1에 표시한다.
                    imgDice1.setImageResource(R.drawable.dice6);
                }
                if (num2 == 0){
                    // 주사위1을 화면1에 표시한다.
                    imgDice2.setImageResource(R.drawable.dice2);
                } else if (num2 == 1) {
                    // 주사위2을 화면1에 표시한다.
                    imgDice2.setImageResource(R.drawable.dice2);
                } else if (num2 == 2) {
                    // 주사위3을 화면1에 표시한다.
                    imgDice2.setImageResource(R.drawable.dice3);
                }else if (num2 == 3) {
                    // 주사위4을 화면1에 표시한다.
                    imgDice2.setImageResource(R.drawable.dice4);
                }else if (num2 == 4) {
                    // 주사위5을 화면1에 표시한다.
                    imgDice2.setImageResource(R.drawable.dice5);
                }else if (num2 == 6) {
                    // 주사위6을 화면1에 표시한다.
                    imgDice2.setImageResource(R.drawable.dice6);
                }

                // 4. 애니메이션 효과를 준다.
                YoYo.with(Techniques.Shake)
                        .duration(400)
                        .repeat(0)
                        .playOn(imgDice1);
                YoYo.with(Techniques.Shake)
                        .duration(400)
                        .delay(10)
                        .repeat(0)
                        .playOn(imgDice2);
            }
        });

    }
}
안드로이드에서 로그 남기는 방법
필요한 곳에서 이렇게 적어주면, 하단의 Logcat에서 확인이 가능하다.
괄호를 열고 "Dice Main"이라고 적으면 실제로는 문자열 앞에 tag : 가 자동 생성 된다.
Log.i("Dice Main", "버튼 눌렸다.");
app / res / layout / activity_main.xml
<?xml version="1.0" encoding="utf-8"?>
<androidx.constraintlayout.widget.ConstraintLayout xmlns:android="http://schemas.android.com/apk/res/android"
    xmlns:app="http://schemas.android.com/apk/res-auto"
    xmlns:tools="http://schemas.android.com/tools"
    android:layout_width="match_parent"
    android:layout_height="match_parent"
    android:layout_marginLeft="20dp"
    android:layout_marginRight="20dp"
    android:background="@drawable/app_bg"
    tools:context=".MainActivity">

    <ImageView
        android:id="@+id/imgTop"
        android:layout_width="303dp"
        android:layout_height="196dp"
        android:layout_marginStart="60dp"
        android:layout_marginTop="96dp"
        android:layout_marginEnd="60dp"
        app:layout_constraintEnd_toEndOf="parent"
        app:layout_constraintStart_toStartOf="parent"
        app:layout_constraintTop_toTopOf="parent"
        app:srcCompat="@drawable/top_image" />

    <Button
        android:id="@+id/button"
        android:layout_width="match_parent"
        android:layout_height="wrap_content"
        android:layout_marginStart="20dp"
        android:layout_marginTop="328dp"
        android:layout_marginEnd="20dp"
        android:backgroundTint="#AC622F"
        android:text="Roll the Dice!!"
        android:textSize="22sp"
        app:layout_constraintEnd_toEndOf="parent"
        app:layout_constraintHorizontal_bias="0.0"
        app:layout_constraintStart_toStartOf="parent"
        app:layout_constraintTop_toTopOf="parent" />

    <ImageView
        android:id="@+id/imgDice2"
        android:layout_width="110dp"
        android:layout_height="110dp"
        android:layout_marginStart="15dp"
        android:layout_marginTop="110dp"
        android:layout_marginEnd="55dp"
        app:layout_constraintEnd_toEndOf="parent"
        app:layout_constraintStart_toEndOf="@+id/imgDice1"
        app:layout_constraintTop_toBottomOf="@+id/button"
        app:srcCompat="@drawable/dice2" />

    <ImageView
        android:id="@+id/imgDice1"
        android:layout_width="110dp"
        android:layout_height="110dp"
        android:layout_marginStart="55dp"
        android:layout_marginTop="110dp"
        android:layout_marginEnd="15dp"
        app:layout_constraintEnd_toStartOf="@+id/imgDice2"
        app:layout_constraintStart_toStartOf="parent"
        app:layout_constraintTop_toBottomOf="@+id/button"
        app:srcCompat="@drawable/dice1" />
</androidx.constraintlayout.widget.ConstraintLayout>
res는 각종 재료들?을 넣어두는 곳이다. res는 resources의 약자임
화면의 UI 위젯들을 액티비티에서 가져다 사용하기 위한 방법
위와 같이 android:id= "@+id/imgDice1" 식으로 id name을 설정해 준다.
이 아이디를 java에 데려와서 불러온다.
R.drawable.dice3 이런 식으로 경로 지정해주면 불러올 수 있다. R은 res를 말한다.
app / res / values / Strings.xml
<resources>
    <string name="app_name">주사위 앱</string>
</resources>
앱 이름 바꾸는 방법
String.xml 파일에서는 출력되는 언어 정보들을 관리한다. 위의 코드는 앱의 이름을 '주사위 앱'으로 설정해주는 것이다.
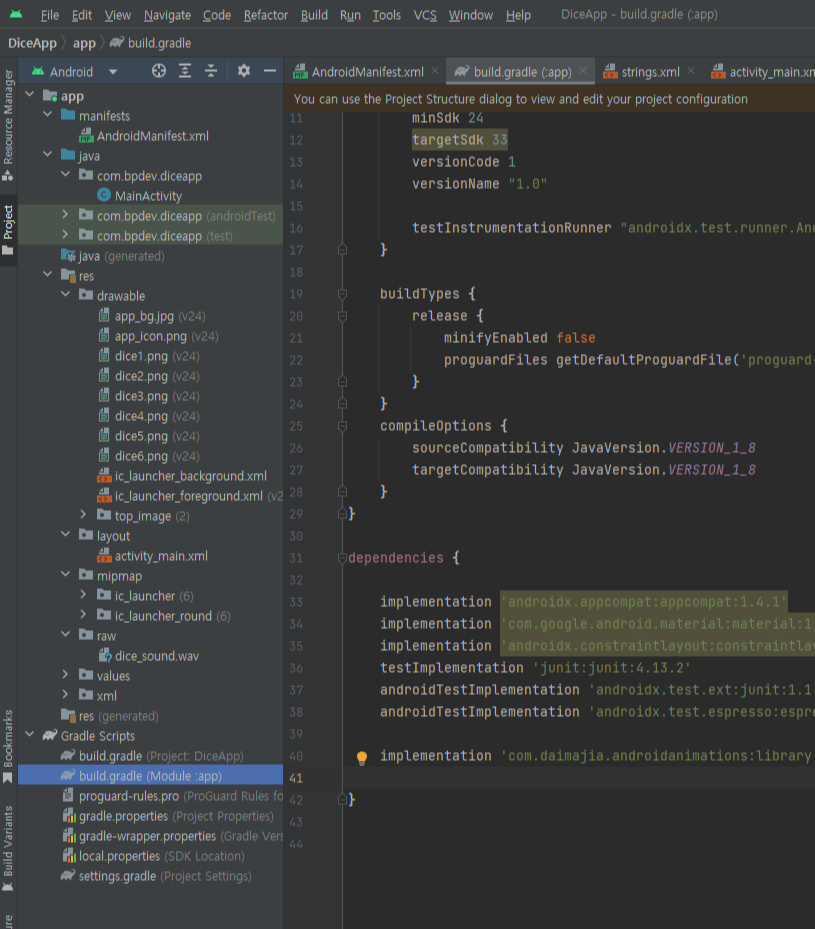
app / Gradle Scripts / build.gradle (module :app)
plugins {
    id 'com.android.application'
}

android {
    namespace 'com.bpdev.diceapp'
    compileSdk 33

    defaultConfig {
        applicationId "com.bpdev.diceapp"
        minSdk 24
        targetSdk 33
        versionCode 1
        versionName "1.0"

        testInstrumentationRunner "androidx.test.runner.AndroidJUnitRunner"
    }

    buildTypes {
        release {
            minifyEnabled false
            proguardFiles getDefaultProguardFile('proguard-android-optimize.txt'), 'proguard-rules.pro'
        }
    }
    compileOptions {
        sourceCompatibility JavaVersion.VERSION_1_8
        targetCompatibility JavaVersion.VERSION_1_8
    }
}

dependencies {

    implementation 'androidx.appcompat:appcompat:1.4.1'
    implementation 'com.google.android.material:material:1.5.0'
    implementation 'androidx.constraintlayout:constraintlayout:2.1.3'
    testImplementation 'junit:junit:4.13.2'
    androidTestImplementation 'androidx.test.ext:junit:1.1.5'
    androidTestImplementation 'androidx.test.espresso:espresso-core:3.5.1'

    implementation 'com.daimajia.androidanimations:library:2.4@aar'

}
오픈소스 라이브러리를 안드로이드 스튜디오에 적용하는 방법
dependencies{ } 부분이 라이브러리 설치하는 곳이다.
중괄호 안에 implementation 'com.daimajia.androidanimations:library:2.4@aar' 같은 설치 구문을 입력하고, 화면 오른쪽 상단의 Sync now를 꼭 눌러줘야 함. 그리고나서
app / java / com.bpdev.diceapp / MainActivity.java 같이 사용할 곳에서 이런 식으로 import 시켜서 사용하면 된다.
import com.daimajia.androidanimations.library.Techniques;
import com.daimajia.androidanimations.library.YoYo;
